> ## Documentation Index
> Fetch the complete documentation index at: https://docs.aiosmedical.com/llms.txt
> Use this file to discover all available pages before exploring further.
# Stripe Setup
> Setup Stripe for your marketing site
## Prerequisites
There are couple of things you need to have before you can setup Stripe for your marketing site.
* [ClinicOS account](https://clinic-os.com/signup)
* [Stripe account](https://dashboard.stripe.com/register)
## Setup
Stripe is a popular payment provider that allows you to process payments and subscriptions securely. Here's how to set up Stripe:
### Step 1: Create a new Stripe Restricted Key
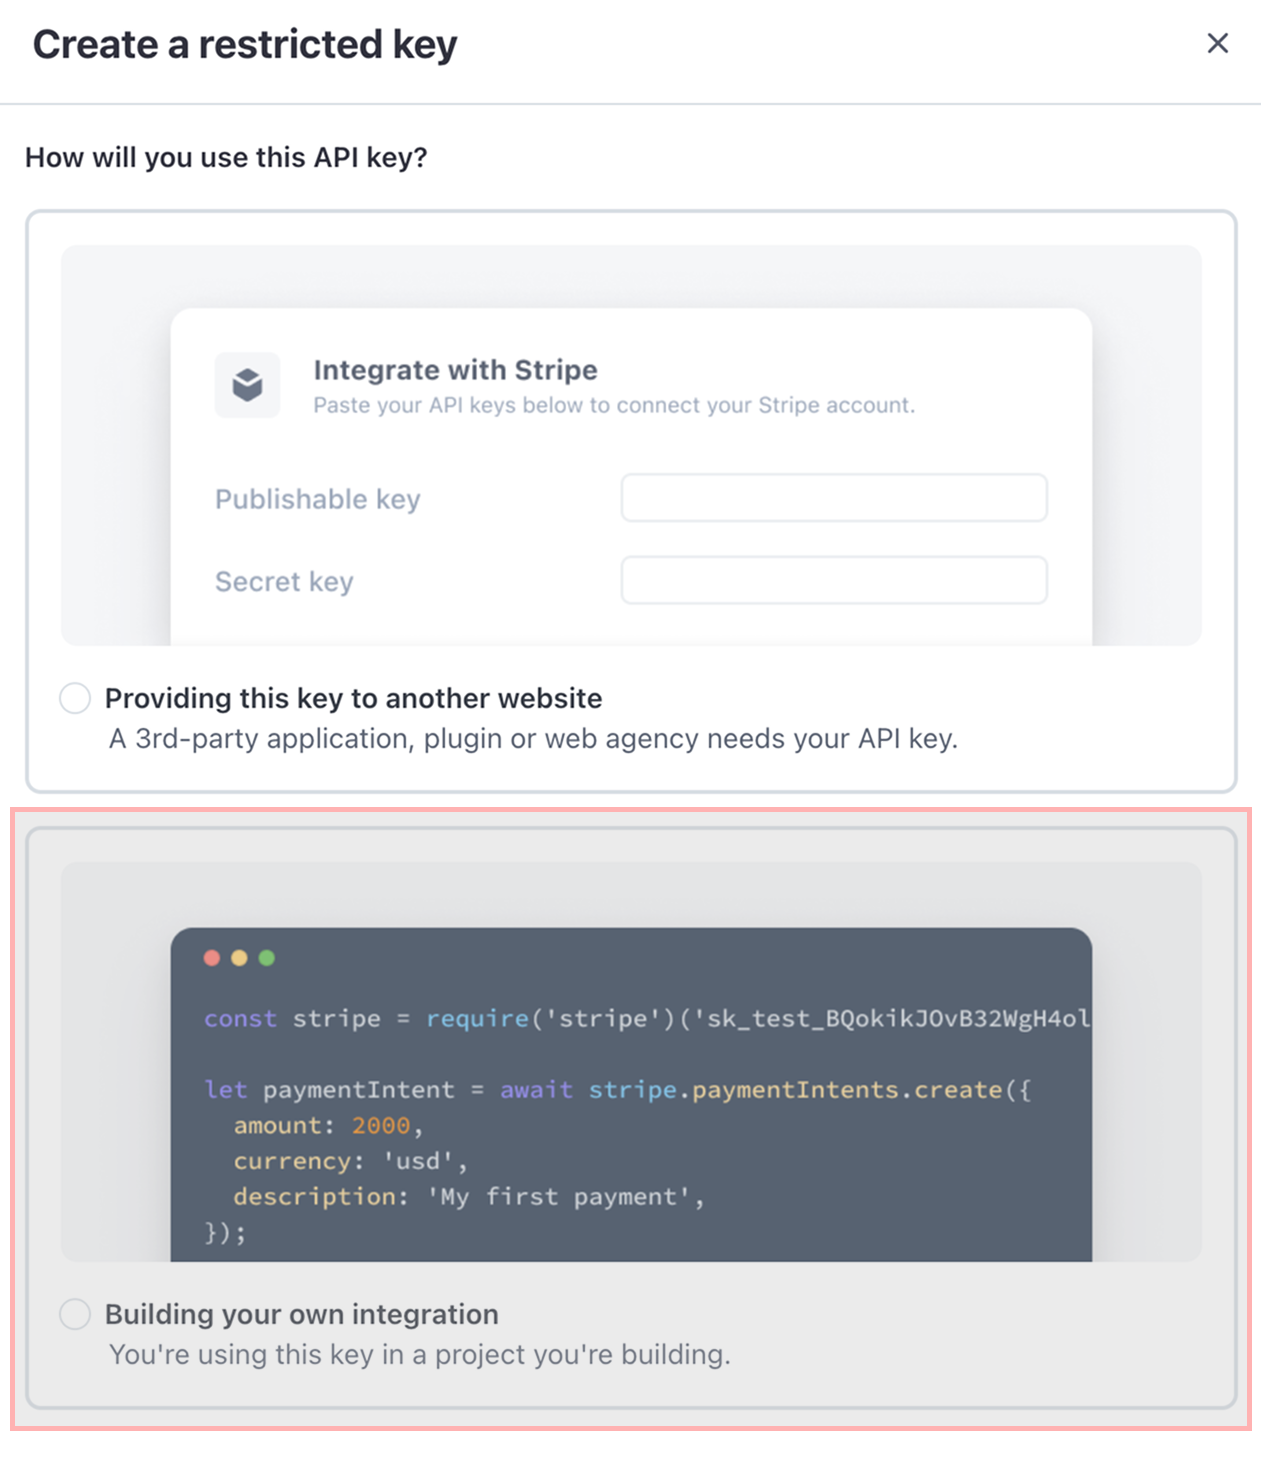
Navigate to your Stripe Dashboard [Stripe API Keys](https://dashboard.stripe.com/apikeys) and press **Create restricted key** button.\
You will be asked: [How will you use this API Key ?](https://docs.aiosmedical.com/payment-providers/stripe-setup#step-1%3A-get-the-stripe-secret-api-key) \
Select **Bulding your own integration**.

 We need the **Stripe Restricted Key** because it allows our system to securely
communicate with Stripe on your behalf. This key is essential for performing
backend operations such as retrieving products and mapping them with
ClinicalOS products.\ Without it, we wouldn’t be able to integrate your Stripe
account with ClinicOS or access any of the necessary data to support our
functionalities
### Step 2: Select Resource Types with Permissions
The next step is to do the following:
* Add a key name (not very important example: **ClinicOS + Your Clinic Name key**)
* Select the correct **Permissions** for **Resource Types** (as shown in the table below)
| Resource Type | Permission Type |
| ---------------------- | --------------- |
| Charges | write |
| Customers | write |
| Events | read |
| Payment Intents | write |
| Payment Methods | write |
| Products | read |
| Setup Intents | write |
| All Checkout resources | write |
| Coupons | read |
| Promotion codes | read |
| Invoices | write |
| Prices | read |
| Subscriptions | write |
On production mode Restricted Keys can be shown only once. So after creating the key please make sure to copy and save it somewhere.
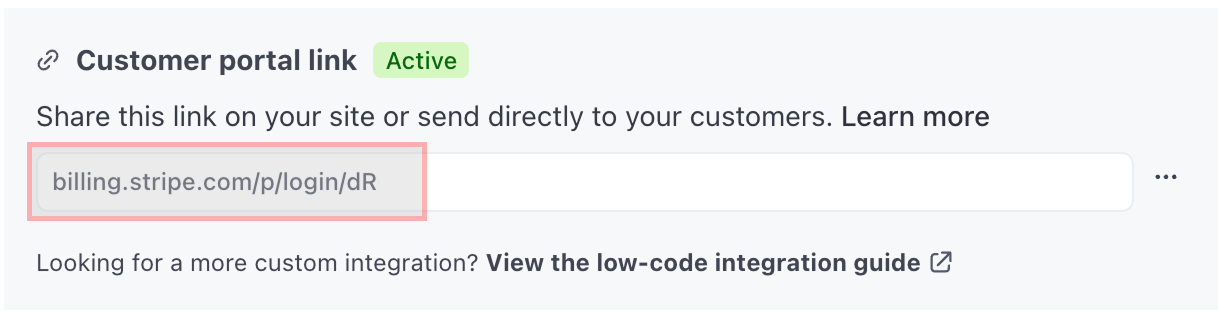
### Step 3: Generate a Customer Billing Portal URL
Navigate to your [Stripe Billing Settings](https://dashboard.stripe.com/settings/billing/portal)
This step is important because it allows you to create a secure, ready-to-use
link for your customers to manage their billing details. By enabling the
**Customer Billing Portal**, your users can independently update payment
methods, view past invoices, manage subscriptions, and more reducing the need
for manual support and improving the overall customer experience.
After activating the link, Stripe will generate a URL (as shown below), which will be needed in the later steps. Save it somewhere.
We need the **Stripe Restricted Key** because it allows our system to securely
communicate with Stripe on your behalf. This key is essential for performing
backend operations such as retrieving products and mapping them with
ClinicalOS products.\ Without it, we wouldn’t be able to integrate your Stripe
account with ClinicOS or access any of the necessary data to support our
functionalities
### Step 2: Select Resource Types with Permissions
The next step is to do the following:
* Add a key name (not very important example: **ClinicOS + Your Clinic Name key**)
* Select the correct **Permissions** for **Resource Types** (as shown in the table below)
| Resource Type | Permission Type |
| ---------------------- | --------------- |
| Charges | write |
| Customers | write |
| Events | read |
| Payment Intents | write |
| Payment Methods | write |
| Products | read |
| Setup Intents | write |
| All Checkout resources | write |
| Coupons | read |
| Promotion codes | read |
| Invoices | write |
| Prices | read |
| Subscriptions | write |
On production mode Restricted Keys can be shown only once. So after creating the key please make sure to copy and save it somewhere.
### Step 3: Generate a Customer Billing Portal URL
Navigate to your [Stripe Billing Settings](https://dashboard.stripe.com/settings/billing/portal)
This step is important because it allows you to create a secure, ready-to-use
link for your customers to manage their billing details. By enabling the
**Customer Billing Portal**, your users can independently update payment
methods, view past invoices, manage subscriptions, and more reducing the need
for manual support and improving the overall customer experience.
After activating the link, Stripe will generate a URL (as shown below), which will be needed in the later steps. Save it somewhere.
 ### Step 4: Setup/Get your billing account name from Stripe
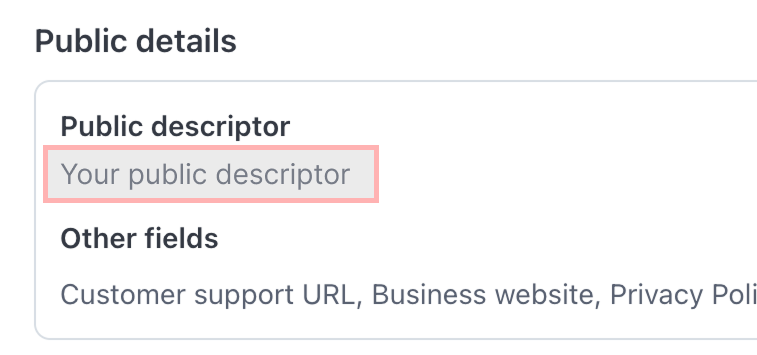
Navigate to your [**Stripe Business Settings**](https://dashboard.stripe.com/test/settings/business-details)
Under your **Public Details Section** copy your **Public Descriptor** value as shown in the image
### Step 4: Setup/Get your billing account name from Stripe
Navigate to your [**Stripe Business Settings**](https://dashboard.stripe.com/test/settings/business-details)
Under your **Public Details Section** copy your **Public Descriptor** value as shown in the image
 ### Step 5: Navigate to the Payment Providers page
Navigate to the [Payment Providers page](https://us.clinic.aiosmedical.com//payment-providers) and click on the "**Add Provider**" button.
Select **"Stripe"** from the list of providers, fill in the required fields and click on the "Save" button.
### Step 5: Navigate to the Payment Providers page
Navigate to the [Payment Providers page](https://us.clinic.aiosmedical.com//payment-providers) and click on the "**Add Provider**" button.
Select **"Stripe"** from the list of providers, fill in the required fields and click on the "Save" button.
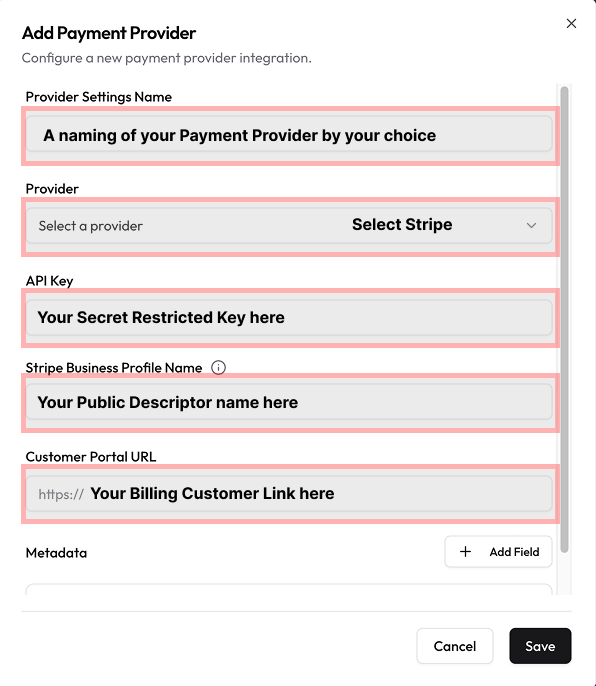 **Explanation of Payment Provider Fields**
| Field | Description |
| ------------------------------ | :------------------------------------------------------------------------------------------------------------------------------------------------------- |
| `Provider Account Name` | This is the name of the Payment Provider Settings you're configuring. \ It doesn't serve any specific functionality other than simply holding a name. |
| `Provider` | A list of providers we currently support, along with the option to select one. \ In this case, we're specifically choosing Stripe. |
| `API Key` | The Resctricted key you created and retrieved from the Stripe Dashboard. |
| `Customer Portal URL` | By offering the Customer Portal URL, customers can update their payment methods, view past invoices, and manage subscriptions |
| `Stripe Business Profile Name` | Your public descriptor name from Billing Details |
| `Metadata` | Not needed. Those are simply safeguards for us, in case something changes in the future on Stripe's side, whether it’s in the API or the business logic. |
### Step 6: Start Using Stripe Configuration
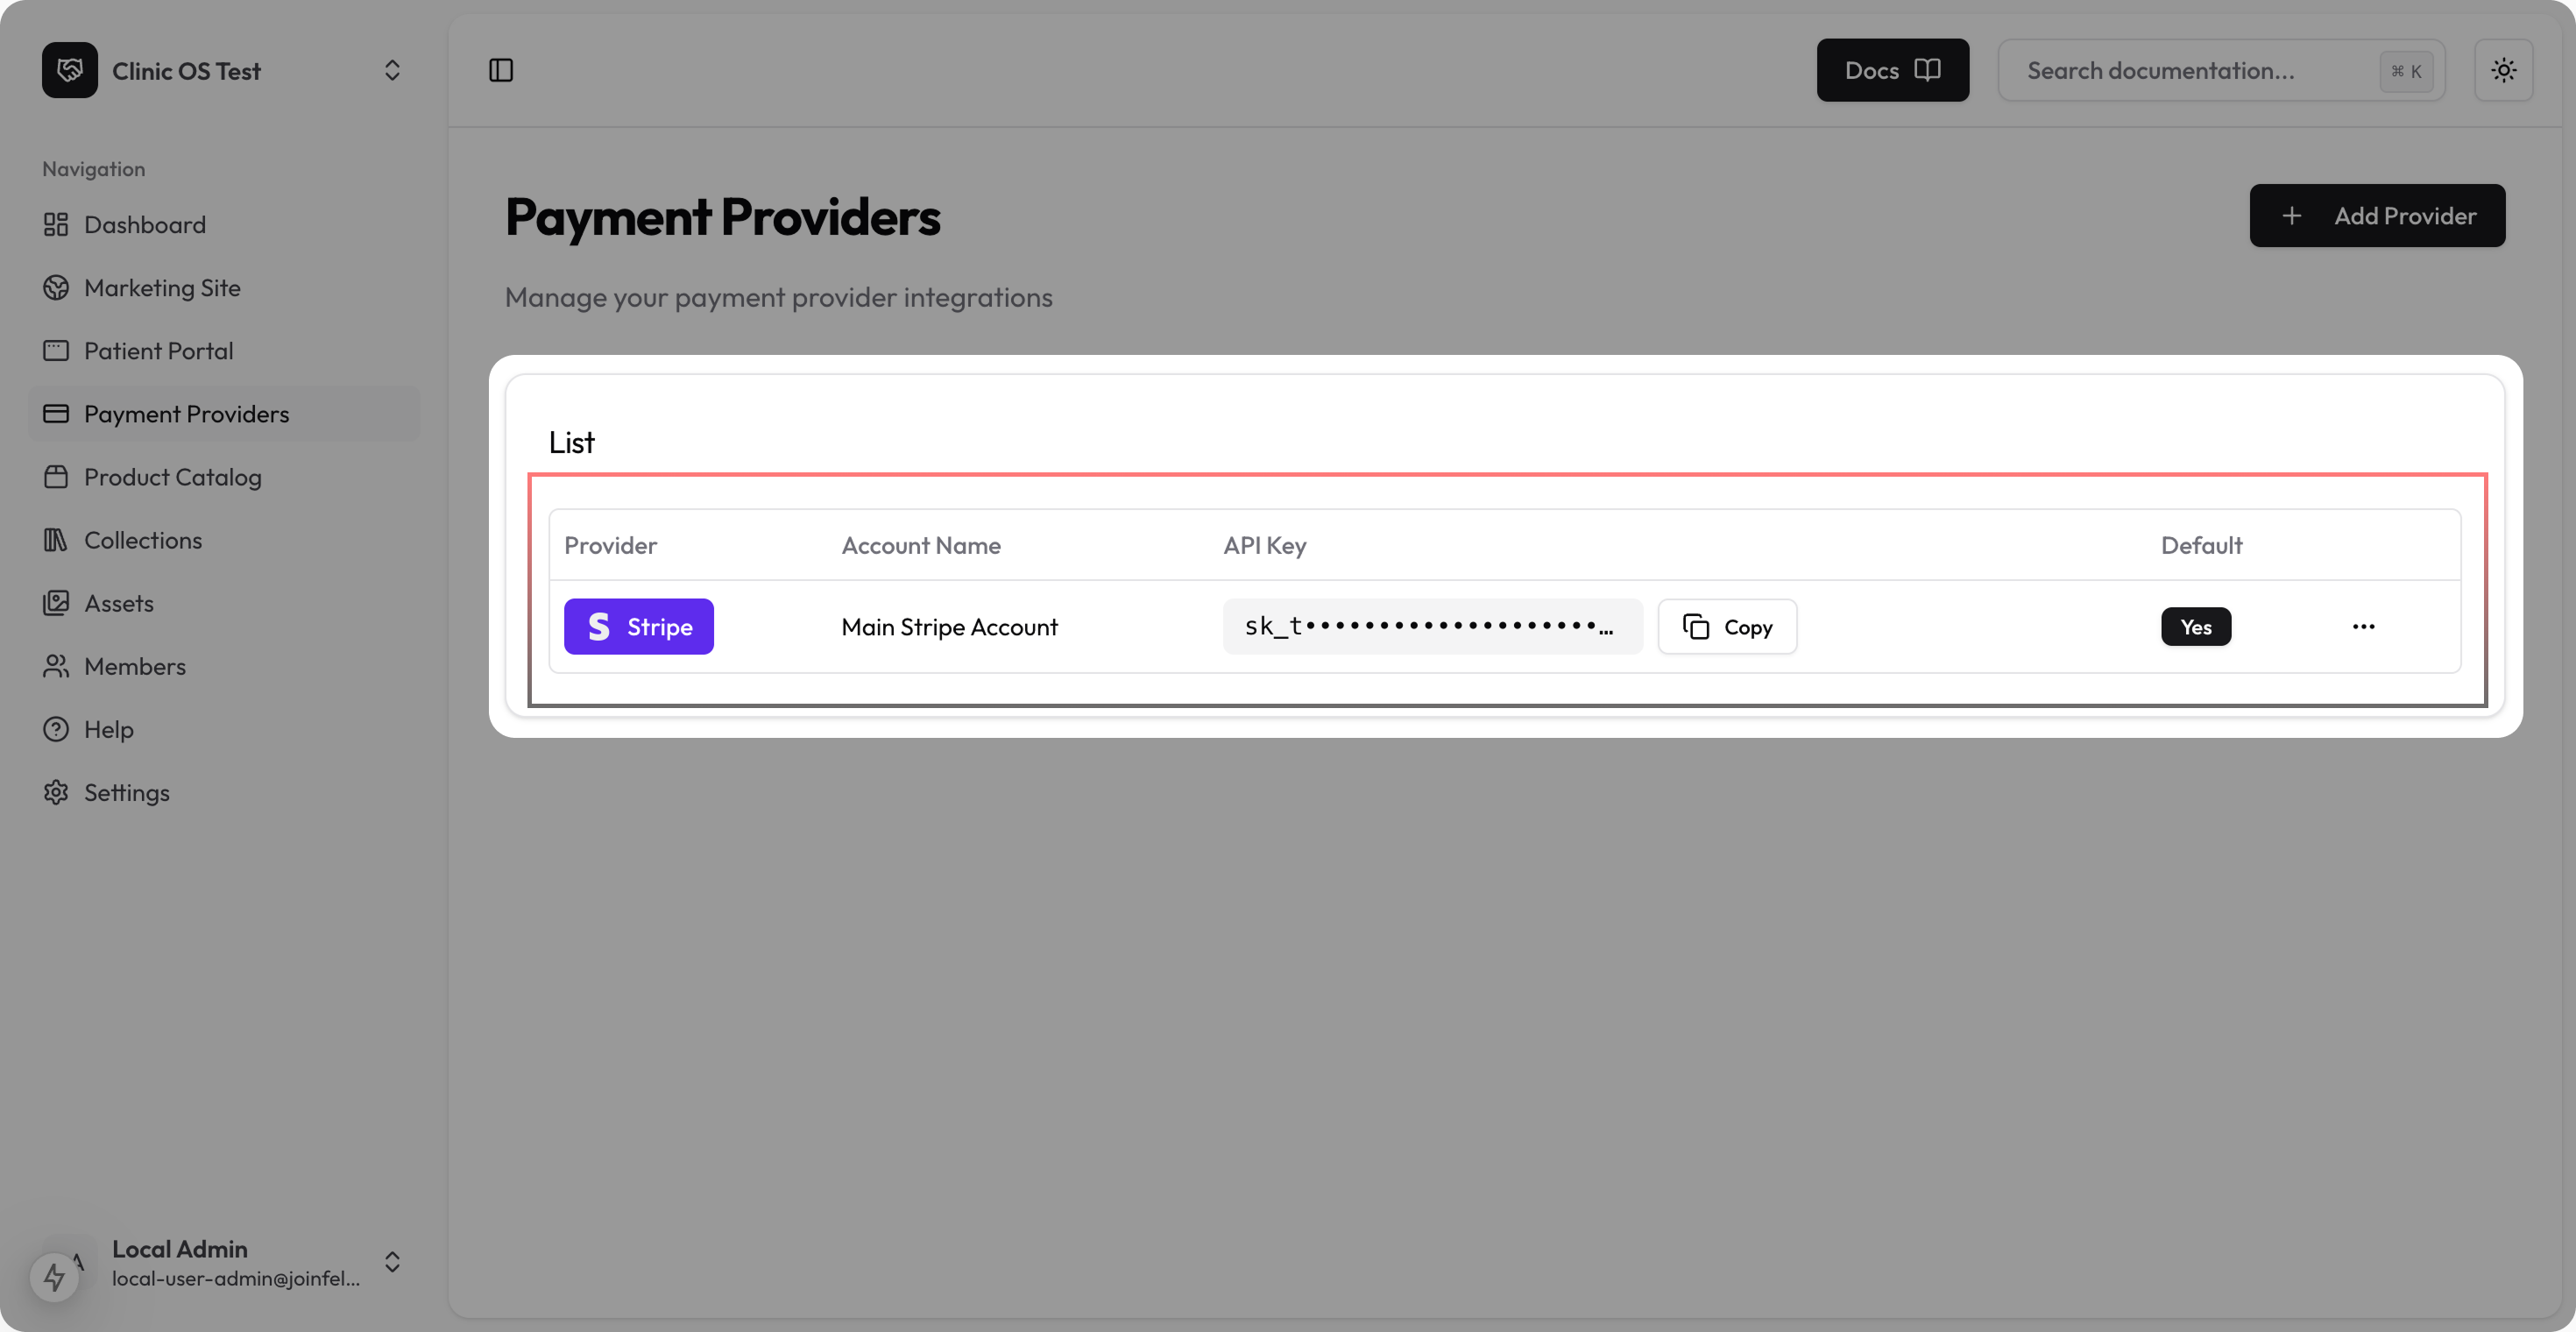
If everything is correct after saving, a new Payment Provider will appear in the list, indicating that the configuration was completed successfully.
**Explanation of Payment Provider Fields**
| Field | Description |
| ------------------------------ | :------------------------------------------------------------------------------------------------------------------------------------------------------- |
| `Provider Account Name` | This is the name of the Payment Provider Settings you're configuring. \ It doesn't serve any specific functionality other than simply holding a name. |
| `Provider` | A list of providers we currently support, along with the option to select one. \ In this case, we're specifically choosing Stripe. |
| `API Key` | The Resctricted key you created and retrieved from the Stripe Dashboard. |
| `Customer Portal URL` | By offering the Customer Portal URL, customers can update their payment methods, view past invoices, and manage subscriptions |
| `Stripe Business Profile Name` | Your public descriptor name from Billing Details |
| `Metadata` | Not needed. Those are simply safeguards for us, in case something changes in the future on Stripe's side, whether it’s in the API or the business logic. |
### Step 6: Start Using Stripe Configuration
If everything is correct after saving, a new Payment Provider will appear in the list, indicating that the configuration was completed successfully.
 ## Next Steps
Now that you've set up Stripe, you might want to:
* [Configure your products](https://clinic-os.com/product-catalog) in ClinicOS
For additional support, refer to [Stripe's documentation](https://docs.stripe.com) or contact our support team.
## Next Steps
Now that you've set up Stripe, you might want to:
* [Configure your products](https://clinic-os.com/product-catalog) in ClinicOS
For additional support, refer to [Stripe's documentation](https://docs.stripe.com) or contact our support team.